The 2025 Expert Guide to Wiggle Wire Lock Channel: 6 Steps for a Weatherproof Seal
September 6, 2025
Abstract
The Wiggle Wire Lock Channel system represents a critical innovation in modern greenhouse construction, providing a secure and efficient method for fastening polyethylene films and other coverings to a greenhouse frame. An analysis of this system reveals its fundamental components: a durable base channel, typically made of aluminum or galvanized steel, and a spring-like steel wire. The efficacy of the system lies in the mechanical interaction between these two parts, which creates a continuous, high-friction grip on the covering material without causing punctures. This mechanism ensures a weatherproof seal, protecting crops from adverse conditions such as high winds, heavy rain, and temperature fluctuations. The choice of materials, particularly between PVC-coated and bare galvanized steel wire, has significant implications for the longevity of the greenhouse film, with coated wires offering superior protection against abrasion for thinner films. Proper installation, involving meticulous frame preparation, precise channel alignment, and correct wire insertion technique, is paramount to maximizing the system's performance and durability across diverse global climates.
Key Takeaways
- Properly install the Wiggle Wire Lock Channel for a durable, weatherproof seal.
- Choose PVC-coated wire for thinner films to prevent abrasion and extend their life.
- Select galvanized steel wire for thicker, woven plastics for superior strength.
- Install greenhouse film on a warm, calm day to achieve optimal, lasting tension.
- Ensure the channel is securely fastened to the frame to withstand high winds.
- Regularly inspect the system for any signs of wear to ensure crop protection.
- Combine with a quality ventilation system for comprehensive environmental control.
Table of Contents
- Understanding the Wiggle Wire Lock Channel System: A Foundational Overview
- Step 1: Meticulous Planning and Material Selection
- Step 2: Preparing the Greenhouse Frame for Installation
- Step 3: The Art of Installing the Lock Channel
- Step 4: Draping and Positioning the Greenhouse Polyethylene Film
- Step 5: Mastering the Wiggle Wire Insertion Technique
- Step 6: Final Inspections, Adjustments, and Long-Term Maintenance
- Integrating the System with Other Greenhouse Components
- Frequently Asked Questions (FAQ)
- Conclusion
- References
Understanding the Wiggle Wire Lock Channel System: A Foundational Overview
The integrity of a greenhouse structure is not merely a function of its frame; it is profoundly dependent on the method used to attach its skin. The covering, most often a greenhouse polyethylene film, is the primary barrier between the controlled internal environment and the unpredictable climate outside. The Wiggle Wire Lock Channel system emerges in this context as a simple, yet remarkably effective, solution for this critical task. To truly appreciate its utility, one must first deconstruct the system into its constituent parts and understand the physical principles that govern its function. It is a system born from a need for reliability, ease of use, and strength, especially in regions facing harsh weather, from the gusty plains of South Africa to the heavy snows of Russia.
Imagine for a moment the forces acting upon a large sheet of plastic stretched over a frame. Wind creates both positive pressure, pushing against the film, and negative pressure, or suction, pulling it away. Rain and snow add weight, creating downward force. The sun’s heat causes the material to expand, while cold causes it to contract. A fastening system must contend with all these dynamic forces continuously. Simple staples or battens create localized stress points and puncture the film, creating weaknesses that are often the first points of failure. The Wiggle Wire Lock Channel, by contrast, distributes the load evenly along the entire length of the channel, creating a continuous grip that is both gentle on the film and exceptionally strong.
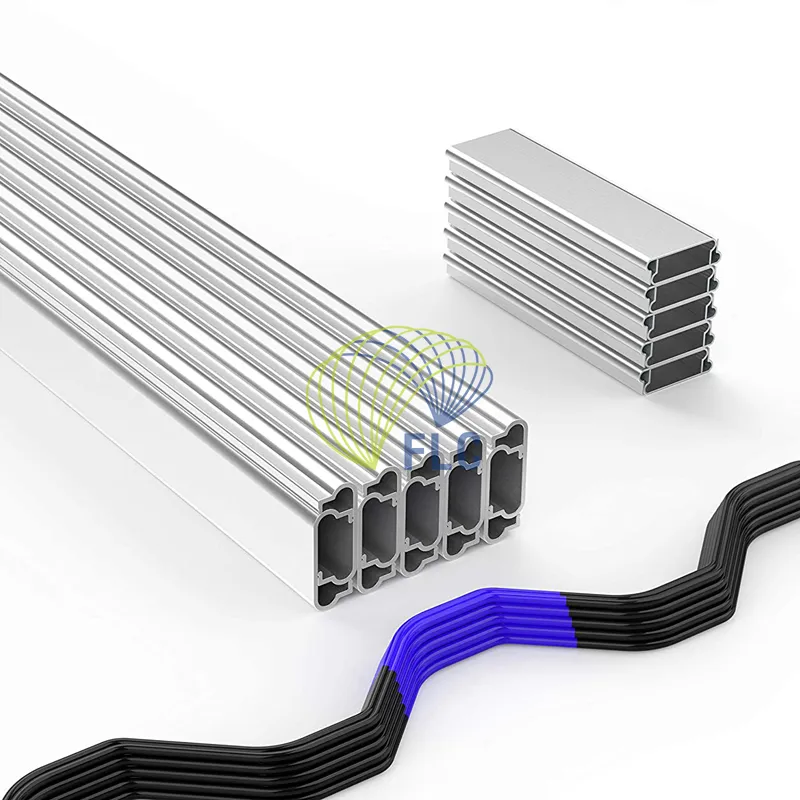
The Anatomy of the System: Channel vs. Wire
At its heart, the system consists of two distinct but inseparable components: the lock channel and the wiggle wire.
The channel, often referred to as a U-channel or base channel, is the stationary part of the system. It is a length of extruded metal, typically aluminum or galvanized steel, shaped to form a specific profile. This profile is not a simple "U"; it is carefully engineered with internal curves and lips designed to receive and securely hold the wiggle wire. As noted by suppliers like , quality channels often include features like self-drilling center groove guides to simplify installation. The channel is screwed directly onto the greenhouse frame—the hip boards, baseboards, and any end-wall framing where the plastic film needs to be terminated. It forms the permanent track into which the film and wire will be set.
The wiggle wire, also known as a spring wire, is the active component. It is a piece of high-tensile steel wire that has been bent into a continuous zig-zag or "wiggle" pattern. This wire is what gives the system its name and its unique functionality. When the greenhouse film is laid over the channel, the wiggle wire is pressed into the channel on top of the film. The wire’s spring-like nature causes it to expand outward, pressing the film against the inner walls of the channel. The "wiggles" create multiple points of contact, generating immense friction that locks the film firmly in place. It is a beautifully simple concept that provides a grip so secure that it can hold multiple layers of material, such as a primary polyethylene film and a secondary shade cloth, within the same channel.
Material Science: Why Aluminum and Steel Dominate
The choice of materials for the Wiggle Wire Lock Channel system is not arbitrary; it is a considered decision based on the demands of the agricultural environment. Durability, resistance to corrosion, and strength are the primary virtues sought.
The channel is almost universally made from either aluminum or galvanized steel. Aluminum is lightweight, exceptionally resistant to rust and corrosion, and easy to cut and drill. Its longevity makes it a premium choice, particularly in humid or coastal environments where salt spray can be a factor. Galvanized steel, which is steel coated with a protective layer of zinc, offers a more economical alternative that still provides excellent strength and a high degree of corrosion resistance. The galvanization process protects the underlying steel from rust, though this protection can be compromised if the coating is deeply scratched. For most applications, both materials perform admirably, with the choice often coming down to budget and specific environmental concerns.
The wiggle wire itself is crafted from high-tensile spring steel. This is what allows it to be flexed during installation and then spring back to exert constant pressure inside the channel. The critical variation in wiggle wires lies in their coating.
| Wire Type | Primary Material | Coating | Best Use Case | Primary Advantage | Primary Consideration |
|---|---|---|---|---|---|
| PVC-Coated Wiggle Wire | High-Tensile Steel | Polyvinyl Chloride (PVC) | Thinner films (e.g., 6 mil), single-layer applications | Reduces friction and abrasion, prolonging film life | Coating can degrade over time with UV exposure |
| Galvanized Wiggle Wire | High-Tensile Steel | Zinc (Galvanization) | Thicker woven plastics (e.g., 9-12 mil), high-stress areas | Greater strength and durability, lower cost | Can be rougher on plastics, potentially causing premature wear on thin films |
As industry experts at explain, the choice is a trade-off. A PVC-coated wiggle wire is smoother and gentler on the greenhouse film. The plastic coating acts as a buffer, reducing the friction and abrasion that can occur as the film expands and contracts with temperature changes. This is particularly valuable for thinner, non-woven films, such as standard 6-mil greenhouse polyethylene film. The bare, galvanized steel wire is tougher and offers a slightly stronger grip, making it a good choice for heavy, durable materials like 9-mil or 12-mil woven plastic, which can withstand more abrasion. The decision, therefore, hinges on a careful assessment of the covering material being used.
The Physics of a Secure Grip: How It Works
The genius of the Wiggle Wire Lock Channel is in its application of basic physics. The system does not rely on adhesives or punctures. Instead, it relies on friction and distributed pressure.
When the wiggle wire is pressed into the channel over the film, several forces come into play. First, the wire, being made of spring steel, naturally wants to expand to its original shape. This expansion exerts an outward force against the walls of the channel. Second, the "wiggles" of the wire create a series of alternating pressure points. The peak of each wiggle pushes the film against one side of the channel, while the trough of the next wiggle pushes it against the opposite side.
This alternating pressure creates a tortuous path for the film, effectively trapping it. To pull the film out, one would have to overcome the cumulative friction generated at dozens of points along every meter of the channel. This is fundamentally different from a staple, where the entire force of the wind is concentrated on a single, small point of entry. With the wiggle wire system, that same wind force is distributed over the entire length of the installation, meaning no single point is under excessive stress. This distribution of force is what prevents tearing and ensures the system can withstand wind gusts that would shred a film attached with less sophisticated methods. The result is a fastening system that is not only strong but also reversible, allowing for easy removal and re-tensioning of the film when necessary.
Step 1: Meticulous Planning and Material Selection
The successful implementation of a Wiggle Wire Lock Channel system begins long before the first screw is driven. It begins with a phase of careful consideration and planning, where the specific needs of the greenhouse project are matched with the appropriate materials. Rushing this stage is a false economy, as a poor choice here can lead to premature failure of the greenhouse covering, potential crop loss, and the need for costly replacements. The process involves a holistic assessment of the structure, its intended use, and the climatic realities it will face.
Assessing Your Greenhouse Structure and Climate
The first act of planning is to look closely at the greenhouse frame itself. Is it made of wood, steel, or aluminum? The type of frame will influence the choice of fasteners used to attach the lock channel. The locations where the film must be secured need to be identified: the baseboards around the perimeter, the hip boards along the roofline, and the framing around doors, vents, and end walls. Every termination point for the greenhouse polyethylene film is a candidate for a Wiggle Wire Lock Channel.
Simultaneously, one must consider the local climate with an almost meteorological focus. For growers in the Middle East or parts of South America, the primary concern might be extreme UV radiation and high temperatures, which can accelerate the degradation of both the film and any plastic components. In this case, selecting a high-quality, UV-stabilized film and perhaps an aluminum channel for its superior heat dissipation and corrosion resistance would be a prudent choice. For a grower in Russia or other regions with significant snowfall, the concern is weight. The system must be robust enough to hold the film securely under heavy snow loads without sagging or tearing. This might lead one to select a stronger, thicker film and ensure the lock channel is fastened at very close intervals to distribute the load. In windy regions, like coastal South Africa, the primary enemy is wind uplift. Here, the integrity of the entire Wiggle Wire Lock Channel system is tested, and ensuring a secure attachment of the channel to the frame is of the utmost importance.
Choosing the Right Wiggle Wire: Coated vs. Uncoated
With a clear understanding of the structural and climatic context, the next deliberation is the selection of the wiggle wire itself. As previously discussed, the choice is primarily between a PVC-coated wire and a bare, galvanized steel wire. This is not a matter of one being universally better, but of which is more appropriate for the specific application.
Let's revisit the core trade-off. The PVC coating provides a sacrificial, smooth layer that protects the greenhouse film from abrasion. When the film expands and contracts with daily temperature cycles, it rubs against the wire. Over thousands of these cycles, the friction from a rougher, uncoated wire can slowly wear down the film, creating weak spots. The smooth PVC surface mitigates this wear, significantly extending the life of a standard 6-mil poly film (Giacomelli & Roberts, 1993). Therefore, for most standard single-layer greenhouse applications, especially in climates with wide temperature swings, the coated wire is the superior long-term investment.
However, there are situations where the uncoated, galvanized wire is preferable. When using extremely durable, thick (9-mil or greater) woven polyethylene films, the material itself is far more resistant to abrasion. In these cases, the slight increase in gripping strength and the lower cost of the galvanized wire can make it the more logical choice. It is also favored in applications where maximum strength is the absolute priority, as the direct metal-on-metal contact (or metal-on-tough-plastic) provides a marginally more aggressive grip. A thoughtful grower must weigh the cost of the wire against the cost and lifespan of the film it is intended to secure. More often than not, protecting the more expensive and labor-intensive film is the wiser economic decision.
Selecting the Appropriate Lock Channel Profile
While most lock channels appear similar at a casual glance, subtle variations in their design and material can have a significant impact on their performance. The two primary materials, as established, are aluminum and galvanized steel.
| Feature | Aluminum Lock Channel | Galvanized Steel Lock Channel |
|---|---|---|
| Corrosion Resistance | Excellent; naturally forms a protective oxide layer. Ideal for humid/coastal areas. | Good; relies on a zinc coating which can be compromised by scratches. |
| Weight | Lightweight; easier to handle and install, especially on longer runs. | Heavier; provides a sense of robustness but can be more cumbersome to install. |
| Cost | Generally higher initial cost. | More economical; often chosen for large-scale or budget-conscious projects. |
| Heat Conductivity | High; dissipates heat quickly, which can be a minor benefit in hot climates. | Lower; retains heat longer than aluminum. |
| Installation | Softer metal, easier to drill and cut. | Harder metal, requires more effort to drill and cut. |
Beyond material, the profile of the channel itself can differ. Some channels are designed to be slightly wider to more easily accommodate multiple layers of film and shade cloth. Others may have a double-hump design, creating two separate channels side-by-side, which is perfect for installations that require an air-inflated double layer of poly for insulation. When selecting a channel, it is wise to procure it from a reputable supplier, such as the comprehensive product lines available from specialized retailers, to ensure it is designed to work seamlessly with standard wiggle wires and is made from high-quality, properly treated materials. The profile should have smooth internal edges to avoid creating any sharp points of contact with the film.
Calculating Material Quantities: A Practical Guide
The final stage of planning is a simple but critical exercise in measurement. One must calculate the total linear footage of channel and wire needed. This involves measuring every surface where the film will be terminated. Measure the length of both baseboards, both hip boards, and the full perimeter of the end walls. Remember to account for framing around doors and vents.
Once you have the total length, it is a wise practice to add a contingency of 5-10% to your order. This accounts for any miscalculations, cuts that go awry, or sections that may be damaged during shipping or installation. It is far less disruptive to have a small amount of leftover material than to halt the project midway through to wait for a small, supplemental order to arrive.
The wiggle wires are typically sold in specific lengths (e.g., 6-foot sections). The lock channels are also sold in standard lengths (e.g., 6.5-foot or 12-foot sections). You will need an equal linear footage of both. For fasteners, a good rule of thumb is to place a screw every 18 to 24 inches (45 to 60 cm) along the length of the channel. For high-wind areas, reducing this spacing to 12 inches (30 cm) provides a much more secure attachment. Calculate the total length of the channel in inches and divide by your chosen spacing to determine the number of screws required, again adding a small surplus. This careful accounting ensures that when installation day arrives, you have everything you need to complete the job efficiently and without interruption.
Step 2: Preparing the Greenhouse Frame for Installation
With materials in hand, the focus shifts from the abstract realm of planning to the tangible work of preparation. The quality of the final installation is directly proportional to the care taken at this stage. A clean, smooth, and properly marked frame is the foundation upon which a durable, weatherproof seal is built. This preparatory work ensures that the Wiggle Wire Lock Channel is installed flat, true, and securely, allowing it to perform its function without compromise.
Surface Cleaning and Inspection
The first order of business is to ensure that the surfaces of the greenhouse frame where the channel will be mounted are clean and free of debris. This applies to hip boards, baseboards, and any end-wall framing. Over time, these surfaces can accumulate dirt, sawdust, old paint drips, or even mildew. Any such protrusion, however small, can prevent the lock channel from sitting perfectly flat against the frame. A channel that is not flush will create gaps and may be subject to stress, potentially leading to failure over time.
Take a stiff brush or a cloth and wipe down all mounting surfaces. For wooden frames, this is also the perfect opportunity to inspect for any signs of rot, splintering, or damage. A screw driven into soft, rotten wood will not hold securely. Any compromised sections of wood should be repaired or replaced before proceeding. For metal frames, check for any significant rust or corrosion that might compromise the structural integrity of the mounting point. A light sanding of any rough spots can create a smoother surface for the channel. This act of cleaning and inspection is a small investment of time that pays significant dividends in the long-term reliability of the system.
Marking and Aligning for Precision
Precision is the guiding principle of this step. The Wiggle Wire Lock Channel must be installed in a straight, continuous line to function correctly. A wavy or misaligned channel will not only look unprofessional but will also create uneven tension on the greenhouse film, potentially leading to wrinkles or stress points.
The best tool for this job is a chalk line. For long, straight runs like a baseboard or hip board, a chalk line provides a perfect, unambiguous guide. Simply tack one end of the line at the beginning of the run, stretch it taut to the other end, and snap it. This will leave a crisp, straight line to follow. For end walls, which often have arches or curves, the process requires more care. You may need to use a flexible measuring tape and make a series of marks to guide the placement of the channel along the curve.
When marking, consider the final position of the greenhouse polyethylene film. The channel should be placed so that the film can wrap smoothly over the edge of the frame member and into the channel. For example, on a hip board, the channel is typically mounted on the top or outer face, allowing the roof plastic to drape over and be secured. On a baseboard, it is mounted on the outside face. Taking a moment to visualize the path of the film and how it will enter the channel can prevent frustrating mistakes later.
Pre-drilling: A Step for Accuracy and Ease
While many self-tapping screws are designed to be driven directly into wood or even light-gauge steel, the practice of pre-drilling the holes for the lock channel fasteners is highly recommended for several reasons.
First, pre-drilling ensures maximum accuracy. It is much easier to place a drill bit precisely on your marked chalk line than it is to start a screw on that same line, as screws can sometimes "walk" or wander as they begin to bite into the material. Drilling a pilot hole guarantees the screw will go in exactly where intended, keeping the channel perfectly aligned.
Second, pre-drilling prevents the wood from splitting. This is especially important when working with wooden frames and installing screws close to the edge of a board. Driving a screw without a pilot hole can force the wood fibers apart, creating a split that weakens the connection. A pilot hole removes a small amount of material, giving the screw threads room to engage without causing damage. The pilot hole should be slightly smaller than the diameter of the screw's shaft (not the threads) to ensure a tight fit.
Third, for metal frames, pre-drilling is often not just a recommendation but a necessity. While self-tapping screws can handle thin-gauge steel, they will struggle with thicker steel tubing. Pre-drilling with a bit designed for metal makes the process of driving the screws significantly faster and less strenuous, and it reduces wear and tear on both the screws and your drill. This small, extra step transforms the installation of the channel from a potentially frustrating task into a smooth, precise operation.
Step 3: The Art of Installing the Lock Channel
The installation of the lock channel is the moment the system begins to take physical form on the greenhouse structure. It is a process that demands both strength and precision. Each section of channel must be securely fastened, perfectly aligned with the next, and smoothly navigated around the contours of the frame. This is the skeleton of the fastening system, and its strength will determine the entire system's ability to resist the forces of nature.
Fastener Selection: Screws for Durability
The choice of fastener is a critical decision. While nails or staples might seem like a quick option, they lack the holding power and longevity required for this application. The undisputed champion for installing a Wiggle Wire Lock Channel is the screw. Screws provide superior pull-out resistance, which is essential for withstanding the suction forces of high wind.
The ideal screw is a high-quality, corrosion-resistant, self-tapping screw with a hex head. The hex head allows for the use of a nut driver bit in a drill, which provides a much more positive engagement than a Phillips or square drive head. This reduces the chance of the bit "camming out" or stripping the screw head, especially when driving into tougher materials. The length of the screw should be sufficient to pass through the channel and penetrate deeply into the frame member. A general rule is that the screw should embed into the wood or metal frame by at least 1 to 1.5 inches (2.5 to 3.8 cm). For material, stainless steel screws offer the ultimate in corrosion resistance, but high-quality, ceramic-coated or hot-dip galvanized screws are also excellent and more economical choices that will provide years of reliable service.
A Step-by-Step Installation Process for the Channel
With the frame prepared and fasteners selected, the installation can proceed in a methodical manner.
- Position the First Piece: Take the first section of lock channel and place it on the frame, carefully aligning it with your chalk line guide. If you have pre-drilled pilot holes, the alignment should be nearly automatic.
- Install the First Screw: Secure one end of the channel with a single screw. Do not fully tighten it yet; leave it just loose enough that the channel can be pivoted slightly for final alignment.
- Align and Secure the Other End: Move to the far end of the channel section. Align it precisely with the chalk line and install a second screw. Now the channel is held in its correct position.
- Fill in the Intermediate Screws: With the channel secured at both ends, proceed to install the remaining screws at your predetermined spacing (e.g., every 18 inches). As you drive each screw, ensure it is snug, but avoid over-tightening. Over-tightening can strip the hole (especially in wood) or even deform the aluminum channel, which you want to avoid. The goal is to have the channel sit flat and securely against the frame without being warped.
- Butt Joints Tightly: When you reach the end of one section of channel, the next section should be butted up directly against it. There should be no significant gap between the sections. A continuous, uninterrupted channel is crucial for a continuous, uninterrupted seal. A small gap of 1/8 inch (3 mm) or less is acceptable, but anything larger could create a weak point or cause the wiggle wire to snag during installation.
- Repeat the Process: Continue this process, section by section, until all the required surfaces of the greenhouse are covered. Maintain the discipline of following your guide line and keeping the butt joints tight.
This systematic approach ensures that the entire run of the Wiggle Wire Lock Channel is straight, strong, and ready to receive the film.
Navigating Corners and Curves with the Channel
Greenhouses are not always made of simple straight lines. They have corners, and many designs, like hoop houses or gothic arches, are defined by their curves. The Wiggle Wire Lock Channel must be able to follow these contours.
For outside corners, such as the corner of an end wall, the simplest method is to cut the two meeting channels at a 45-degree angle to form a clean miter joint. This provides a professional look and a continuous track for the wiggle wire. A miter saw or a handsaw with a miter box is the best tool for making these angled cuts accurately.
For inside corners, the channels can simply be butted into the corner. One channel runs all the way into the corner, and the other is cut to fit snugly against it.
Navigating gentle curves, like those on a hoop house, is surprisingly straightforward. The aluminum or steel channel has enough flexibility to be bent to conform to a wide-radius curve. As you attach the channel to the curved frame, the act of screwing it down at close intervals (you may want to decrease spacing to 12 inches on curves) will naturally force the channel to follow the arc of the hoop. You can gently pre-bend the channel over your knee to get it started, but the screws will do most of the work. For very tight-radius curves, you may need to make a series of short, straight cuts on the back and sides of the channel (kerf cuts) to allow it to bend more sharply. This should be done with care to avoid weakening the channel excessively. The goal is always to maintain a smooth, continuous path for the wiggle wire to follow.
Step 4: Draping and Positioning the Greenhouse Polyethylene Film
This stage marks a significant transformation in the project. The greenhouse, which until now has been a bare skeleton, is about to receive its skin. The handling and positioning of the large, often unwieldy, sheet of greenhouse polyethylene film is a task where technique, timing, and patience are more valuable than brute force. A properly tensioned film is not just aesthetically pleasing; it is structurally superior, better at shedding water and snow, and less susceptible to wind damage.
Handling Greenhouse Polyethylene Film with Care
Greenhouse film, despite its durability once installed, is vulnerable to damage during the handling process. It is susceptible to punctures, scratches, and tears. Before you even begin to unroll the film, it is imperative to survey the area around the greenhouse. Remove any sharp rocks, stray tools, branches, or anything else on the ground that could damage the film as it is being unfolded and pulled over the structure.
When you unroll the film, do so on a clean, grassy area or lay down a temporary ground tarp if the surrounding area is rough. Unrolling the film on a gravel driveway, for example, is a recipe for disaster. The film is often folded in a specific way by the manufacturer to aid in installation. Pay attention to any labels or instructions on the packaging, such as "Lay this side down." Many professional-grade films have a designated "inside" and "outside," with the outer layer containing enhanced UV inhibitors or anti-dust properties.
Pulling the film over the greenhouse frame is typically a job for at least two people, and more for a large structure. The goal is to "float" the film over the frame, rather than dragging it. Dragging the film across the metal or wood frame, especially across the newly installed lock channels, can cause scratches or snags that create weak points. Have people on either side of the greenhouse, and gently pull the film up and over the ridge. On a windy day, this can be extremely challenging and even dangerous, which leads to the next critical consideration.
Timing Your Installation: The Role of Temperature
The ideal day for installing greenhouse film is a calm, overcast, and warm day. Each of these conditions plays a role in achieving a professional result.
Wind: Wind is the greatest enemy during film installation. A large sheet of plastic acts like a giant sail. Even a moderate breeze can make the film impossible to control, creating a risk of damage to the film or the frame, and a safety risk for the installers. Attempting to install film in windy conditions is an exercise in frustration and should be avoided at all costs. Wait for a calm day.
Temperature: The role of temperature is more subtle but equally profound. It relates to the thermal properties of polyethylene. Like most materials, polyethylene film expands when it is warm and contracts when it is cold (Plastics Industry Association, 2020). If you install the film on a very cold day and pull it tight, it will become loose and saggy on the first warm, sunny day as the material expands. Conversely, and more advantageously, if you install the film on a warm day and pull it snug, it will naturally shrink and become tighter as the temperature drops overnight or with the changing seasons. This self-tensioning effect is the key to achieving a drum-tight finish that will last. Aim for a temperature of between 60°F and 75°F (15°C to 24°C) for the best results. Installing in extreme heat can cause you to over-stretch the film, which can lead to premature failure.
Achieving Proper Tension: The Key to Longevity
With the film draped over the frame, the process of tensioning and preliminary fastening begins. The goal is to remove all the slack and major wrinkles from the film before locking it permanently into the Wiggle Wire Lock Channel.
Start by securing the film in the middle of one of the long sides of the greenhouse (e.g., a hip board or baseboard). Use a short, temporary piece of wiggle wire to tack the film in place. Do not install the full length of wire yet. Move to the opposite side of the greenhouse and gently pull the film to remove the slack across the width of the structure. The film should be snug, but not stretched to its absolute limit. Tack it in place on the opposite side, again in the middle.
Now you have a central "belt" of tension. From this central point, work your way outwards towards the corners, alternating from side to side. Pull the film diagonally and downwards to smooth out wrinkles. Think of it like stretching a canvas for a painting. You are working from the center out, creating even tension across the entire surface. Use small pieces of wiggle wire to temporarily tack the film in place every few feet as you go.
Take your time with this process. Step back frequently to look at the film from a distance. Are there any large wrinkles or areas of slack? If so, release the temporary tacks in that area and re-tension it. It is far easier to make these adjustments now than after the wiggle wire is fully installed. This patient approach ensures that the final covering will be smooth, tight, and professional, ready to stand up to the weather for years to come. A tight film sheds rain and snow efficiently and vibrates less in the wind, which reduces wear and noise.
Step 5: Mastering the Wiggle Wire Insertion Technique
This is the culminating step where the film is permanently secured. The insertion of the wiggle wire into the lock channel is what activates the system, creating the firm, continuous grip that defines its effectiveness. While the concept is simple, the technique requires a certain feel and rhythm. Mastering this motion ensures a quick, secure installation without damaging the film or fighting with the wire.
The "Wiggle" Motion: A Detailed Breakdown
The process is not one of brute force. You do not simply push the wire straight down into the channel. Doing so would be difficult and could risk tearing the film. The correct technique is a rocking or "wiggling" motion that feeds the wire into the channel progressively.
- Start at One End: Begin at one end of a run of lock channel where the film is already draped and tensioned.
- Angle the Wire: Hold a section of wiggle wire and insert the first few inches into the channel at a low angle, almost parallel to the film.
- The First Push: Push the starting end of the wire into the channel to anchor it.
- Rock and Push: Now, begin the characteristic motion. Place your thumbs on the top of the wire. Push down and forward on one of the upper "humps" of the wiggle wire. As it seats into the channel, rock your pressure onto the next hump, pushing it down and in. Continue this motion—rocking from side to side and applying downward pressure—along the length of the wire.
- Listen and Feel: As the wire seats correctly, you will often feel and hear a satisfying "click" or "snap" as it locks into the channel's groove. The motion should become fluid and rhythmic. You are essentially "walking" the wire into the channel.
- Overlapping Sections: Wiggle wires are typically 6 feet long. When you reach the end of one piece, start the next piece by overlapping the last few inches of the previous one. This ensures there are no gaps in the holding pressure. The end of the new wire should be inserted under the beginning of the next one to create a seamless connection.
It's a good idea to practice this motion on a spare piece of channel and film before working on the greenhouse itself. Getting a feel for the right amount of pressure and the correct angle will make the actual installation go much more smoothly. Some installers find that wearing gloves can improve their grip and protect their hands.
Securing Multiple Layers: Poly Film and Shade Cloth
One of the significant advantages of the Wiggle Wire Lock Channel system is its ability to secure multiple layers of material in a single channel. This is commonly done when installing both a primary greenhouse polyethylene film and an exterior shade cloth, or when creating an air-inflated double layer of poly for improved insulation.
The process is nearly identical to securing a single layer. You simply lay all the layers of material over the channel together. For a poly film and a shade cloth, lay the poly film down first, then lay the shade cloth directly on top of it. Smooth out both layers as much as possible. Then, insert the wiggle wire through both layers into the channel using the same rocking motion.
The channel and wire are designed to handle the extra thickness. The wire will press both layers firmly against the channel walls. It is remarkable how securely the system can hold two or even three layers of material. This versatility is invaluable for growers who need to adapt their greenhouse coverings to changing seasons, for example, by adding a shade cloth for the summer months. An associated film reeler can be used in conjunction with this system for roll-up side walls, allowing for dynamic ventilation control.
Common Mistakes to Avoid During Insertion
While the process is robust, a few common errors can compromise the installation or cause frustration.
- Stretching the Film with the Wire: Do not use the wiggle wire itself to stretch the film. The film should already be properly tensioned and held in place before you begin the final wire insertion. Trying to pull the film tight as you install the wire will result in uneven tension and may damage the film.
- Not Seating the Wire Fully: It is crucial that the wire is pushed all the way into the channel. If it is only partially inserted, it will not provide the intended holding power and may pop out under wind load. You should not be able to easily pull the wire out with your fingers. If you can, it needs to be pushed in further.
- Using Damaged Wire: Do not use wiggle wire that is bent out of shape, kinked, or rusted. A damaged wire will not exert even pressure and can create a point of failure. It can also have sharp edges that could puncture the film. Always use new, high-quality wire for the best results.
- Forgetting to Overlap: Leaving a gap between sections of wiggle wire creates a small, unsecured spot in the film. While it may seem insignificant, this spot can catch the wind and begin to flap, putting stress on the surrounding areas and potentially leading to a tear over time. Always overlap the ends of the wire sections.
By being mindful of these potential pitfalls and employing the correct technique, the installation of the wiggle wire becomes the final, satisfying step in creating a secure, weatherproof envelope for the greenhouse.
Step 6: Final Inspections, Adjustments, and Long-Term Maintenance
The installation of the Wiggle Wire Lock Channel is not truly complete when the last piece of wire is snapped into place. The final phase involves a thorough inspection, minor adjustments, and an understanding of the long-term maintenance required to ensure the system's longevity and performance. A greenhouse is a dynamic structure, and a small amount of proactive care can prevent large problems down the road, protecting the significant investment in the structure and the crops within.
Conducting a Thorough Post-Installation Check
Once the film is fully secured, take the time to conduct a detailed walk-around and inspection of the entire greenhouse. This is a critical quality control step.
First, examine the film itself. Look for any wrinkles or slack areas that may have been missed during the tensioning process. Small wrinkles can often be worked out by temporarily removing a section of wiggle wire, pulling the film taut, and re-inserting the wire. Look closely at the film where it enters the channel. Are there any signs of tearing or stress?
Second, inspect the Wiggle Wire Lock Channel itself. Run your hand along the channel (gloves are recommended) to feel for any sections of wiggle wire that are not fully seated. If you find a high spot, use a small block of wood and a mallet to gently tap it down until it is flush with the rest of the wire. Check that all butt joints between channel sections are tight and that there are no sharp edges exposed that could chafe the film.
Third, look at the overall structure from a distance. Does the film appear uniformly tight and smooth? The surfaces should be taut like a drumhead. This initial inspection is your best opportunity to correct any minor imperfections before they are "set" by time and temperature changes.
Seasonal Adjustments and Re-tensioning
Even with a perfect installation, a greenhouse film may require minor adjustments over time. The constant expansion and contraction due to temperature changes, combined with the stresses of wind and precipitation, can cause the film to lose a small amount of tension over its first year.
It is good practice to inspect the film tension seasonally, especially after the first few months of service and after any significant storm events. If you notice an area has become loose or started to flap in the wind, re-tensioning is straightforward with the wiggle wire system. This is one of its greatest strengths compared to permanent fastening methods.
To re-tension a section, you need a tool to remove the wiggle wire. A flat-head screwdriver or a specialized wiggle wire removal tool can be used. Insert the tip of the tool under one end of the wire and pry it up and out of the channel. Once you have a starting piece out, you can often pull the rest of the section out by hand. With the wire removed, pull the film tighter to remove the slack, and then re-install the wiggle wire. This ability to easily adjust and "tune" the skin of the greenhouse is invaluable for maintaining peak performance and extending the life of the film.
Extending the Lifespan of Your Wiggle Wire Lock Channel System
The Wiggle Wire Lock Channel system is designed for durability, but a few simple maintenance practices can help it last even longer.
- Keep it Clean: Periodically, especially when changing out the greenhouse film, take the opportunity to clean out the lock channels. Over the years, dust, dirt, and small bits of debris can accumulate inside the channel. A quick pass with a brush or compressed air will ensure the channel is clean and ready to provide maximum grip for the new film.
- Inspect for Corrosion: While aluminum and galvanized steel are highly corrosion-resistant, it is still wise to inspect the channels periodically, especially in harsh coastal or industrial environments. Look for any signs of advanced rust on steel channels, particularly around screw holes or scratches. A light touch-up with a cold galvanizing spray can help arrest any corrosion that has started.
- Mind the Wire Coating: For PVC-coated wiggle wires, be aware that the PVC coating will eventually degrade from UV exposure. After many years of service (typically 8-10 years or more), the coating may become brittle and start to flake off. While the underlying steel wire will still function, it will have lost its protective, anti-abrasion quality. When you replace your greenhouse film after its rated lifespan (usually 4-6 years), inspect the condition of your wiggle wire. If the coating is compromised, it is a wise and relatively small investment to replace the wire at the same time to ensure maximum protection for your new film. As a company dedicated to quality, we understand the importance of durable components, a value reflected in our company history and mission.
By adopting this mindset of inspection and proactive maintenance, the Wiggle Wire Lock Channel system will serve as a reliable and steadfast component of your greenhouse for many years, providing the secure seal needed for successful and profitable growing.
Integrating the System with Other Greenhouse Components
A greenhouse is more than just a frame and a covering; it is an integrated system where each component must work in harmony with the others. A secure Wiggle Wire Lock Channel installation is the foundation, but its full potential is realized when it is properly coordinated with the greenhouse's environmental control systems. The integrity of the seal it creates directly impacts the efficiency of ventilation, heating, and cooling.
Coordination with Roll-up Sides and Ventilation Systems
Many modern greenhouses, from small high tunnels to large commercial operations, utilize roll-up sides for natural ventilation. This is a cost-effective and efficient way to regulate temperature and humidity. The Wiggle Wire Lock Channel plays a dual role in this setup.
First, the fixed portion of the wall film, located above the roll-up section, is securely terminated using the lock channel. This creates a durable, fixed anchor point from which the roll-up portion operates. Second, the bottom edge of the roll-up curtain itself is often attached to the roll bar using a Wiggle Wire Lock Channel. This provides a strong, continuous attachment along the entire length of the pipe, preventing the fabric from ripping away from the bar under the stress of rolling or high winds.
The effectiveness of any greenhouse ventilation system, whether it's a passive roll-up side or a fan-based mechanical system, depends on a relatively airtight structure. Unwanted air leaks, which can occur with poorly fastened films, undermine the ability to control airflow. A properly sealed greenhouse allows a circulation fan to move air efficiently, creating a uniform environment without "short-circuiting" through unintended gaps. The continuous seal provided by the Wiggle Wire Lock Channel system is therefore not just about weatherproofing; it is about creating the controlled environment necessary for an effective ventilation strategy (Sanford, 2011).
The Role of the Film Reeler in a Wiggle Wire Setup
A film reeler, or gearbox, is the manual or automated mechanism that drives a roll-up side. It allows a grower to easily raise and lower a long section of greenhouse wall. The connection between this system and the wiggle wire is symbiotic. The Wiggle Wire Lock Channel provides the secure anchor points for the fixed film and the roll-up bar, while the film reeler provides the controlled movement.
When planning a roll-up side, it is important to consider the forces involved. The reeler and its associated gear motor will be applying torque to the roll bar. The film, securely attached to this bar by a wiggle wire channel, must be able to withstand these forces without tearing. The distributed grip of the wiggle wire is far superior to individual screws or clamps in this application, as it spreads the load evenly along the pipe. This synergy between the secure fastening of the wiggle wire and the mechanical advantage of the film reeler creates a robust and reliable ventilation system.
Ensuring Compatibility with Gear Motors and Circulation Fans
For larger or automated greenhouses, a gear motor is often used to power the film reeler. These motors need to be programmed with upper and lower limits to prevent them from over-rolling and damaging the film or the structure. The secure termination point created by the Wiggle Wire Lock Channel at the top of the roll-up wall serves as a reliable physical stop and a reference point for setting these limits.
Furthermore, the overall airtightness achieved with a wiggle wire installation makes the entire environmental control system more efficient. A circulation fan running in a leaky greenhouse is like trying to cool a house with the windows open. It is constantly fighting against uncontrolled air exchange. By minimizing these leaks, the Wiggle Wire Lock Channel allows the circulation fan and the broader ventilation system to work as designed, maintaining consistent temperatures and humidity levels with less energy consumption. This creates a healthier environment for plant growth and a more profitable operation for the grower. The thoughtful integration of these various high-quality greenhouse products is the hallmark of a well-designed growing structure.
Frequently Asked Questions (FAQ)
Can I use Wiggle Wire Lock Channel on a wooden greenhouse frame? Yes, absolutely. The system is highly versatile and works exceptionally well on wooden frames. You will need to use appropriate wood screws to attach the lock channel to the baseboards, hip boards, and end-wall framing. It is highly recommended to pre-drill pilot holes to prevent the wood from splitting and ensure the screws hold securely.
How many layers of plastic can I secure with one wiggle wire? Most standard Wiggle Wire Lock Channel systems are designed to securely hold two layers of 6-mil greenhouse film. Many can even accommodate a third, thinner layer, such as a light shade cloth. This makes it ideal for creating an air-inflated double-layer poly roof for insulation or for securing a primary film and a shade cloth simultaneously.
What is the difference between PVC-coated and galvanized wiggle wire? PVC-coated wiggle wire has a smooth plastic coating that reduces friction and abrasion on the greenhouse film, extending its lifespan. It is the recommended choice for thinner films (under 8-mil). Galvanized wire is bare, zinc-coated steel. It is slightly stronger and more economical but can be abrasive on thinner films. It is best suited for use with thicker, more durable woven plastics .
How do I install the channel around a curve or corner? For gentle curves, like on a hoop house, the channel can be bent to conform to the arc as you screw it into the frame. For sharp, 90-degree outside corners, it is best to make a miter cut on two pieces of channel at 45-degree angles to form a clean joint. For inside corners, you can simply butt one channel up against the other.
How often should I replace my wiggle wire? The lock channel itself should last for many decades. The wiggle wire has a very long lifespan as well. However, if you are using PVC-coated wire, the coating may become brittle and degrade after 8-10 years of sun exposure. It is good practice to inspect the wire whenever you replace your greenhouse film and replace the wire if the coating is cracking or flaking off to provide the best protection for your new film.
What spacing should I use for the screws when installing the lock channel? For standard conditions, a screw every 18 to 24 inches (45-60 cm) is sufficient. In areas known for very high winds, it is wise to increase the fastening density by placing a screw every 12 inches (30 cm) to provide maximum holding strength and prevent the channel from being pulled from the frame.
Is a Wiggle Wire Lock Channel system reusable? Yes, the entire system is designed for reusability. The wiggle wire can be removed, and the film can be adjusted, repaired, or replaced. The wire can then be re-inserted to secure the new film. This is a major advantage over single-use fastening methods.
Can I install a Wiggle Wire Lock Channel by myself? Installing the channel itself can be a one-person job. However, pulling the large greenhouse film over the structure and tensioning it properly typically requires at least two people, and more for larger greenhouses. It is much easier and safer with help.
Conclusion
The Wiggle Wire Lock Channel system, in its elegant simplicity, offers a profound solution to one of the most fundamental challenges in greenhouse construction: creating a durable, weatherproof, and reliable seal. Its design, which relies on the physics of distributed pressure and friction rather than punctures, represents a significant advancement over traditional fastening methods. Through a careful process of planning, material selection, and meticulous installation, this system provides growers across the varied climates of South America, Russia, the Middle East, and South Africa with the security needed to protect their crops from the elements.
The journey from a bare frame to a fully skinned and protected greenhouse is one of precision and care. From preparing the frame surfaces to mastering the unique rocking motion of the wire insertion, each step contributes to the integrity of the final structure. The ability to easily accommodate multiple layers, navigate curves, and allow for future adjustments makes the Wiggle Wire Lock Channel an exceptionally versatile and economical choice for both amateur enthusiasts and large-scale commercial operations. By understanding the principles behind the system and integrating it thoughtfully with other components like the ventilation system and film reeler, a grower can create a truly efficient and resilient controlled environment, fostering the optimal conditions for growth and ensuring the longevity of their investment. To learn more about our commitment to providing these foundational tools for growers worldwide, we invite you to explore our story and values.
References
Giacomelli, G. A., & Roberts, W. J. (1993). Greenhouse covering systems. HortTechnology, 3(1), 50-58.
Plastics Industry Association. (2020). Plastics engineering handbook of the Society of the Plastics Industry, Inc. (5th ed.). Springer.
Poly-Tex, Inc. (n.d.). Wiggle Wire® poly fastening system bundles. Retrieved April 30, 2025, from
Sanford, S. (2011). Comparing greenhouse ventilation systems. University of Wisconsin-Extension.
HortiTech Direct. (n.d.). Channel wire lock (wiggle wire only). Retrieved April 30, 2025, from
Bootstrap Farmer. (n.d.). Spring wire for greenhouses. Retrieved April 30, 2025, from
Build My Own Greenhouse. (n.d.). Wiggle wire poly lock. Retrieved April 30, 2025, from